Visit the image gallery for pics and step-by-step instructions.
View Suzuki GT750 part one
View Suzuki GT750: part two
View Suzuki GT750: part three
Picture one: After finishing off the engine build last month, next I needed to sort out all the wiring. Despite having a complete new loom, there were still one or two bits and pieces that provoked some bafflement. The tail-light wiring was too short to reach the main harness (no matter how carefully I routed it), and I had to solder in extensions to reach. Above the motor I was perplexed by these surplus connections until I realised the loom has provision for the optional cooling fan, not fitted on our bike. That’s all right, then.
 Picture two: Space is always tight inside the headlamp shell so, to make sure the wiring will fit correctly, I’ve removed the shell and temporarily connected everything up to see how best to route the wiring. Then I can unplug it all, pop the shell back on and reconnect it with minimum hassle.
Picture three: To make up a full set of new electrical components, owner Roy has shelled out for a new starter solenoid that I can now fit to the electrics plate under the left-hand side panel. Again, getting all the wiring routed correctly has needed some patience – the original wiring had been so bodged I couldn’t use it for reference. The one thing I’m not happy about is the main earth lead, which looks inadequate to me. I’ve used an old starter motor lead to connect the battery negative direct to the bike’s frame and crankcase, which will give a good, reliable earth.
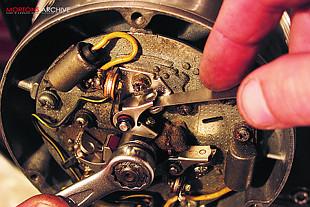
Picture four: There’s life in the electrical system, but still a little setting up to do before the bike will run. Here I’m fitting the points cam to the ignition drive in the left-hand casing. Note the keyed plate that provides timing marks. I’ll be fitting a Newtronic ignition system to the bike later but, for the initial start-up, I’m going to use the old points set-up. This will be easier to troubleshoot if the bike is reluctant to run.
 Picture five: The GT750 has three sets of points, each of which must be individually timed with great accuracy. To get the bike running, I’ll be static timing it with a small timing light, which should be adequate for its initial test run and MoT. When the Newtronic kit goes on, I’ll be setting the timing with a dial gauge and strobe. Here I’m setting the points gap before timing the points.
Picture six: The engine lubrication system must be primed before the initial start-up. I’ve removed the oil pump temporarily from the top of the crankcase, and here I’m using a pressure oilcan to force fresh two-stroke oil through the feed pipes to the cylinders. This will protect the cylinder walls and pistons during those vital first few minutes of running.
Picture seven: With the oil pump refitted, this link arm connects the pump to the right-hand carb. The pump has to be set to deliver the correct amount of oil so, with the throttle held in the open position, I can set the adjuster on the link arm to line up the reference marks on the pump operating arm.
 Picture eight: With fresh fuel in the tank, a borrowed battery fitted and a final check, I’m ready to press the starter button. The bike spins three or four times then catches, and the shed fills with smoke and the lovely burble of a healthy Kettle. A quick check of the tyre pressures and I can take it for a gentle run down the lane to make sure everything is working properly. And here’s a sight you seldom see these days from the saddle of a GT750A – five miles on the speedo. The temperature is good, the electrics, brakes and suspension work, and even the digital gear indicator is behaving. Fantastic – job done!
 ![]()


